
How To Place Photos Side By Side In Blogger
If you've probably been trying to get pics into your blogger posts in a side-by-side fashion, but couldn't quite figure out how to manage it. That's because the option isn't available in the control panel for some reason. If you want to place two photos side by side in blogger, you'll have to go into the HTML of the post itself (NOT the HTML of your template!), but don't worry, it's really very easy to do; you just need to host your image on a free image hosting site like Photobucket. You will, however, have to do insert the new code every time -- in other words, every time you want to create a post in blogger which has side by side pics. So let's get to the part about how you do it.
Step 1
Go to your Blogger dashboard
Step 2
Click on the Posting tab
(Clicking on the posting tab should automatically take you the Create Post section.)
Step 3
When you first open the Create Post section, it will automatically be in Compose mode. To view the HTML mode, you will want to click on the HTML tab, which is right beside the Compose tab. Both of these tabs are on the far right, just above the tool section.
Step 4
Once in the HTML section, you will want to use/paste the following code:
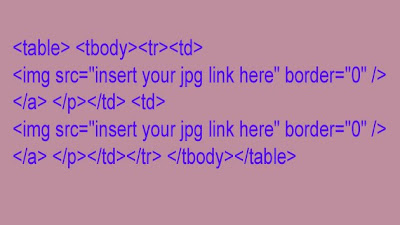
Don't forget to replace the "insert your jpg link here" here with your own link! See below for an example.
Step 5
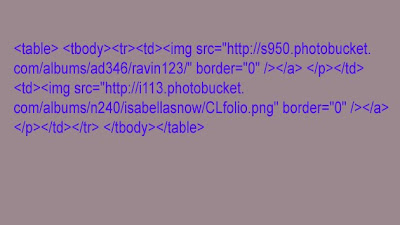
This is the same code, but with img links included as an example.
Step 6
Once you've inserted your HTML code, you can check the images by clicking on the Compose tab. You can also use the Preview link, which is just below it.
Step 7
It's best to insert pics first and then write your blog post, because it can be very tricky to navigate the blog post HTML once you've started to write it.
Publish your post Successful!
If you've probably been trying to get pics into your blogger posts in a side-by-side fashion, but couldn't quite figure out how to manage it. That's because the option isn't available in the control panel for some reason. If you want to place two photos side by side in blogger, you'll have to go into the HTML of the post itself (NOT the HTML of your template!), but don't worry, it's really very easy to do; you just need to host your image on a free image hosting site like Photobucket. You will, however, have to do insert the new code every time -- in other words, every time you want to create a post in blogger which has side by side pics. So let's get to the part about how you do it.
Step 1
Go to your Blogger dashboard
Step 2
Click on the Posting tab
(Clicking on the posting tab should automatically take you the Create Post section.)
Step 3
When you first open the Create Post section, it will automatically be in Compose mode. To view the HTML mode, you will want to click on the HTML tab, which is right beside the Compose tab. Both of these tabs are on the far right, just above the tool section.
Step 4
Once in the HTML section, you will want to use/paste the following code:

Don't forget to replace the "insert your jpg link here" here with your own link! See below for an example.
Step 5
This is the same code, but with img links included as an example.

Step 6
Once you've inserted your HTML code, you can check the images by clicking on the Compose tab. You can also use the Preview link, which is just below it.
Step 7
It's best to insert pics first and then write your blog post, because it can be very tricky to navigate the blog post HTML once you've started to write it.
Publish your post Successful!

0 comments
Post a Comment